Maintenance
General Maintenance
When you are not using the kayak, keep it undercover out of direct sunlight. Always hose it down with fresh water after using it. Hose out the cockpit area as well - footrests, seat and webbing. If small particles of dirt build up on the inside of fibreglass & lightweight polyethylene kayaks, they can be removed by carefully using a water blaster. You can wax the surface to prevent this happening (It is not wise to use a water blaster too often). The outside surface of polyethylene kayaks also has small pinholes on the surface that can collect dirt/dust. These can also be cleared with a water blaster and wax used to fill them. These small holes have no effect on the kayak and are a characteristic of all polyethylene made products.
When storing your kayak away, replace the hard hatches with soft hatches made from a 'breathable' material. This allows the storage areas to dry out and prevents pressure building up inside the storage areas on hot days (This pressure can cause leaks to develop). Clean the outside of your hatches with armourguard every 3 to 4 months. Clean the inside of your hatches with CRC 808 silicon spray. This will keep the hatches good and waterproof, plus they are easier to fit. You should also spray the silicon on your footrests and rudder fittings. Make sure you replace the rubber cockpit stiffener after using your kayak.
Repairs
Polyethylene Kayaks (Linear plastic)
Dent - usually occurs if a kayak is strapped to a roof rack incorrectly or had a severe hit. The easiest way to remove any dent is to pour lots of boiling water onto the damaged area and to apply pressure from the inside of the kayak to push the dent out.
Deep gouge - this can occur if a kayak is dropped from a roof rack or trailer, or hits a sharp stake or rock. Use a soldering iron to smooth over the damaged area, filling in the deepest part of the gouge. Sometimes you may have to cut a slither of plastic from either the cockpit or hatch edge and use this to melt into the gouge. (Similar to repairing skis) The repair can be tidied up by running a panel beater's file across the surface.
Composite kayak (GRP or Kevlar/carbon construction)
Is made up of:
Glass fibres (cloth or Chopped Strand Matt - CSM) & polyester or vinylester resin
Carbon cloth & polyester or vinylester resin
Kevlar & vinylester resin
Epoxy resin should only be used on wooden kayaks.
Only expoxy resin should be used to repair a kayak made from Epoxy resin.
Either polyester or vinylester can be used for repairs to a composite kayak of the same construction.
Polyester or yinylester resin should never be used to repair a kayak made from epoxy resin.
Gelcoat - is a very hard resin used to protect the outer surface of the kayak.
To repair a damaged section of the kayak -
Make sure the area is completely dry and has no grease, glue or silicon.
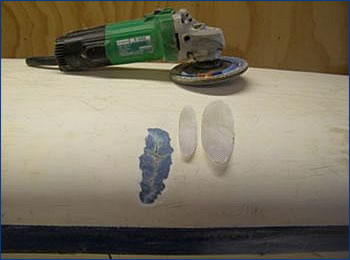
With a disc grinder or sandpaper of about 50 grit, remove all gelcoat on the outside of the kayak to about 20mm - 30mm each side of the damaged section. Some loose fibres can be removed but do not try to remove any of the kevlar strands. Lightly sand surrounding gelcoat. On the inside of the kayak, rough up the area with sandpaper only.
Cut pieces of 10oz glass cloth to overlap the damaged area on the inside & outside by about 15cm. Two layers are usually enough.
Patch ground and sanded, ready for fibre glass repair.
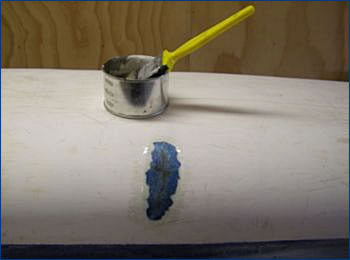
Mix up polyester resin using 3% MEKP(hardener) and thoroughly wet out damaged area. Lay your first smaller piece of cloth over the break and stipple with the brush. When all of the patch is wet out, apply the second layer of cloth and repeat. If you have any nylon 'peal-ply' material, lay this over the join as this with give you a good finish.
When completely set, remove peal-ply. Inside patch is now complete. On the outside, sand repaired area including gelcoat with 120 grit sandpaper.
Patch repaired ready to sand lightly before gel coating.
Mix up waxed gelcoat using 3% MEKP and brush onto repaired area.
When dry it is optional as to whether you sand down the gelcoat with 1000 grit wet & dry sand paper and polish for a good finish.
If repairing a bad gouge or scratch, use gelcoat only to replace the missing gelcoat